
Build AWS EC2 Server without SSH Key
In today’s world when Infrastructure is managed as Code and servers are treated as cattle, there are times we still have to login to servers for checking logs, for auditing or any other troubleshooting reasons. If we have legacy systems then we generally have to connect to servers on regular basis. The most favourable tool to connect to servers is SSH. The SSH is very powerful yet security wise risky tool. There are lot of SSH based vulnerabilities out there that we need to protect ourselves from. In addition to this we also need to safeguard ssh keys from falling into wrong hands. And if we lose our key then generally solution is to recreate the EC2 instance from backup and use a new Key.
AWS let us use AWS SSM service to help us out of evil of SSH. Currently a lot of security engineers advice against the use of SSH to connect to servers. With help of AWS SSM we can connect to EC2 servers using EC2 Connect Web-browser session or AWS SSM CLI or AWS SSM API to avoid use of SSH or SSH key and without opening any inbound traffic and help us get rid of Jump Boxes/Bastion Hosts.
AWS SSM also allows you Powershell based shell access to Windows.
How AWS SSM helps connect to EC2?
In order for you to connect to a EC2 without SSH and and with SSM the below are needed:
- SSM agent need to be installed in EC2 instance. AWS Linux servers comes pre-installed with SSM agent. If you are using any other flavour or windows, then check below links:
Linux: https://docs.aws.amazon.com/systems-manager/latest/userguide/sysman-manual-agent-install.html
Windows: https://docs.aws.amazon.com/systems-manager/latest/userguide/sysman-install-win.html - The SSM Agent running on the EC2 instances must be able to connect to Session Manager’s public endpoint. In this tutorial we will use Public IP of server and Route to Internet Gateway. You can also set up a PrivateLink connection to allow instances running in private VPCs (without Internet access or a public IP address) to connect to Session Manager.
- IAM Instance profile attached to EC2 with trust policy and SSM access as follows:
  Ec2InstanceProfile:
    Type: AWS::IAM::InstanceProfile
    Properties:
      Path: /
      Roles: [ !Ref Ec2InstanceRole ]

  Ec2InstanceRole:
    Type: AWS::IAM::Role
    Properties:
      ManagedPolicyArns:
        - arn:aws:iam::aws:policy/service-role/AmazonEC2RoleforSSM
      AssumeRolePolicyDocument:
        Statement:
          - Effect: Allow
            Principal:
              Service: [ ec2.amazonaws.com ]
            Action:
              - sts:AssumeRole
      Path: /
Benefits of AWS SSM
We talked about benefits of AWS SSM above briefly. Lets list down more here:
Secure Access – You don’t have to manually set up user accounts, passwords, or SSH keys on the instances and you don’t have to open up any inbound ports. Session Manager communicates with the instances via the SSM Agent across an encrypted tunnel that originates on the instance, and does not require a bastion host.
Access Control – You use IAM policies and users to control access to your instances, and don’t need to distribute SSH keys. You can limit access to a desired time/maintenance window by using IAM’s Date Condition Operators!!
Auditability – Commands and responses can be logged to Amazon CloudWatch and to an S3 bucket. You can arrange to receive an SNS notification when a new session is started.
Interactivity – Commands are executed synchronously in a full interactive bash (Linux) or PowerShell (Windows) environment
Programming and Scripting – In addition to the console access that I will show you in a moment, you can also initiate sessions from the command line (aws ssm ...) or via the Session Manager APIs.
AWS Cloudformation Template – Demo for SSM
Le’s see SSM in action. Please use the below Cloudformation template to deploy a VPC and a EC2 server ready to be connected via SSM.
You can use the Default values and there is no need to change unless you have a clash with existing Infrastructure. For example, if you already have a VPC with values given in default you can change CIDR values.
Once this is created, you can see your EC2 instance created with no SSH keys.

You can connect to it by selecting the EC2 instance and clicking on Connect button on top bar.
Once you click you go to Session Manager bar and click Connect button on below.
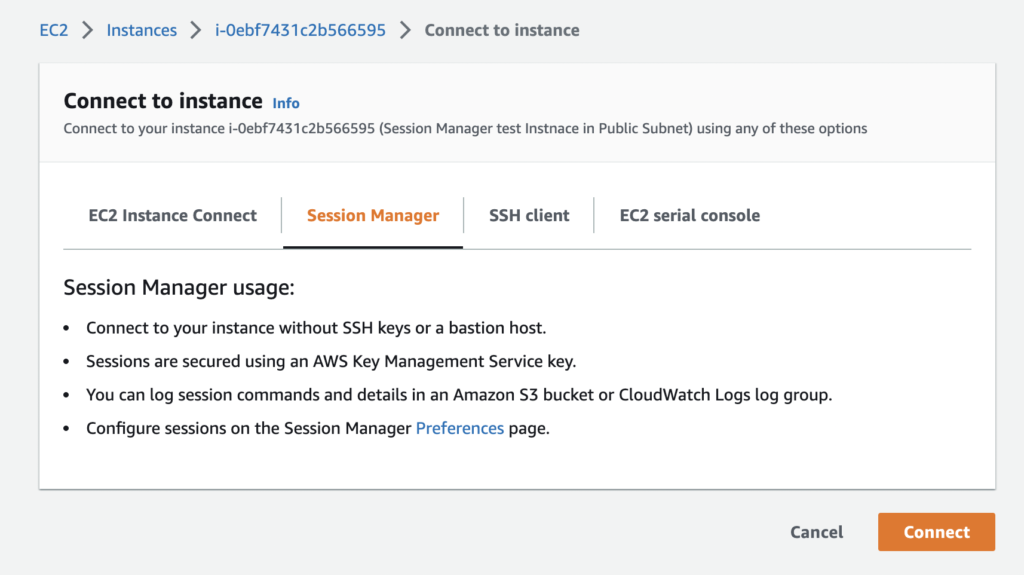
Once you click on Connect, you will be presented with a shell access in your browser!!

Awesome!! You connected to EC2 shell without using any SSH or keys.
I hope this blog helps you to architect your Infrastructure without SSH and helps you to avoid all the risks of SSH. Happy cloud computing!!