
An Ultimate Beginner’s Guide to Docker
Docker is the most popular tool for containerization and is widely used. Docker is the most important must-have tool in your toolkit that every developer or DevOps or even security engineer must learn. It provides a way of running your apps in isolated environments on a host just like a virtual machine would run but in a much faster and effective way. This article is an ultimate beginner’s guide to docker where we will learn how to install and start using it for your projects. Before learning to install it and use it we will also learn some of the internals of docker to better understand it as a tool.
What is Docker?
Docker is a containerization tool that containerizes your applications by building your code into packages called images and then deploying them to run as containers.
So docker is a tool or software that you will install in your local machine where you write code (optionally), on build servers where you turn your code into deployable artifacts called docker images, and on application servers where your run your code.
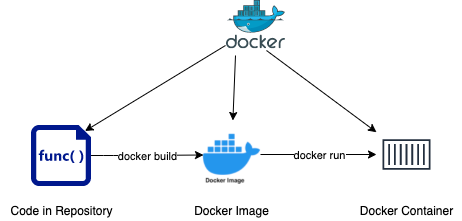
As shown in Figure 1.1, docker build command will pack your code into a deployable artifact called Image and docker run command will run the image as a container. These are the only two commands you will need to run your code as docker container on your local machine or laptop.
Ideally, for production or real-life projects, you would also need to store your created images in Docker Image repository (public or private) called Docker Registry using docker push command on the build servers and then pull them on your application servers using command docker pull and then run them as containers. The flow of docker looks like as shown in Figure 1.2.
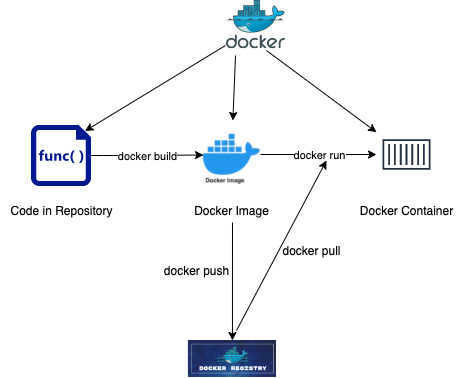
One example of a docker registry is Docker’s Official Registry which is a public repository. You will find a lot of useful official docker images here which you will need to use as the base image for creating your own images. We will look into creating docker images in the next section.
How to create Docker Image?
We learned before that code in the code repository is built into a docker image. Now to pack the code into a docker image, docker build command is not enough. We need to add a file called Dockerfile at the root of the repository.
# Base Image
FROM python:3.6.12

# A Lablel
LABEL author="iDL Tutorials"

COPY requirements.txt /tmp
RUN pip install --no-cache-dir -r /tmp/requirements.txt

COPY ./ /
WORKDIR /app

EXPOSE 8090
#Default command for docker run
CMD [ "python", "./main.py" ]
Dockerfile is a set of instructions docker needs to follow to create your image. Above, we see a simple Dockerfile. As you can see, it has various steps.
The first step is “Base Image” which is fetched from Dockerhub as it is an official public python 3 image from Dockerhub. This image comes pre-installed with python3 on a Unix OS. Now, this is just like an OS installed with no other applications on it. So we add our code and requirements in subsequent steps. These are pretty self-explanatory. The last step CMD is what command the image will execute when it is run using docker run.
On the left side, all CAPS words are called instructions and the right side is called arguments. You can get details of all instructions from the official Dockerfile reference page: https://docs.docker.com/engine/reference/builder/
Now when you run the command, docker build you get a new image that now also packages your application and on executing docker run, will run your code in an isolated environment and will be exposed on port 8090.
docker build -t myimage .
docker run --name my1stcontainer -p 8090:8090 myimage
That’s it. That’s how you run your code in a container.
What is Docker container?
Before we start installing and using Docker, let’s quickly explore about docker container as well.
The docker engine that we use to build and run docker containers is installed as software and it runs Docker containers.
The Docker container under the hood is an LXC Linux container. Linux containers were introduced much earlier than docker and hence containers are not a new concept. Docker uses Linux features to create these Linux containers. Docker with its rich functionality makes it very easy for a developer to run applications using containers that otherwise can be created only by advanced Linux users.
For Microsoft users, this does not mean you cannot run docker on Windows. Docker installation on Windows comes with some way of Linux virtualization and hence works on Windows as well. This type of docker installation is called Hyper-V containerization.
Microsoft has done a lot of work in this area and has created Windows containers as well which mimics Linux LXC containers and allow you to use Windows base images on Windows. So basically there are two types of containers you can run in Windows:
- Hyper-V containers – Linux containers can run on Windows and they actually run in a very small embedded Linux VM. This works on concept that docker can run inside a VM.
- Windows Server containers (WSC) or Process Containers – Created by Windows in 2016, can only run on Windows and do not need to run inside VM. But there are limitations with Windows Containers. If you want to run a WSC on Server 2016, you must have built the container from a Server 2016 base. If you run it on Windows Server 1709 it will not work: it is blocked from starting. This also means, for example, if you run Nano Server as your host OS, you can only run Nano Server base images on that host. This is simply not a limitation that you’ll find with Linux containers.
If you work on .NET then Microsoft provides .NET base images at https://hub.docker.com/_/microsoft-dotnet which can run on Linux servers as well. This is recommended way of running .NET images as you don’t have to pay for an OS License for the host OS and also the base images are lighter and faster. It is much better to run containers on Linux hosts than the above two methods on Windows hosts.
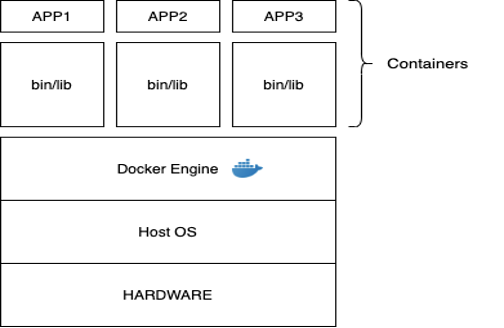
Difference between Virtual Machine and Docker Container
The below is a summary of the difference between Virtual Machine and Docker Container.
| Virtual Machine | Docker Container |
|---|---|
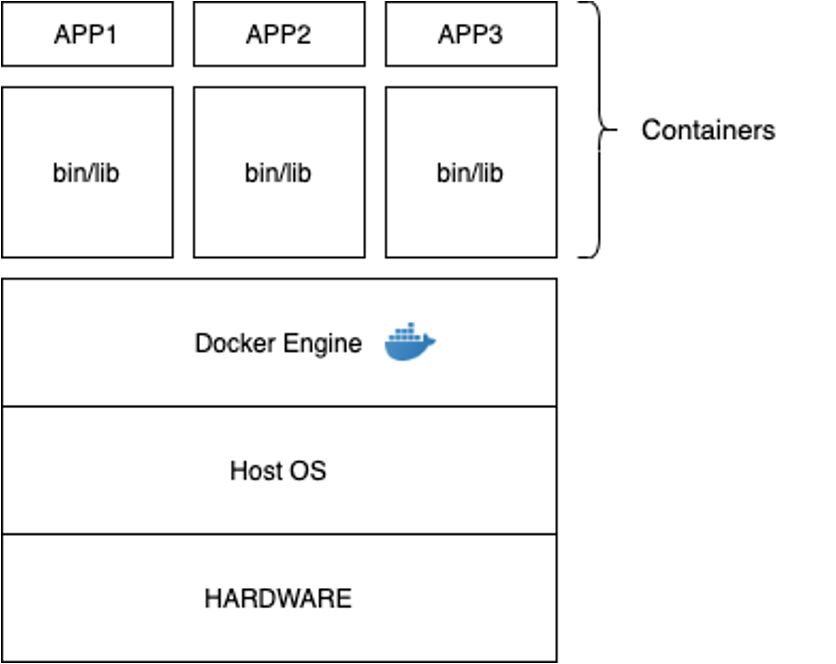
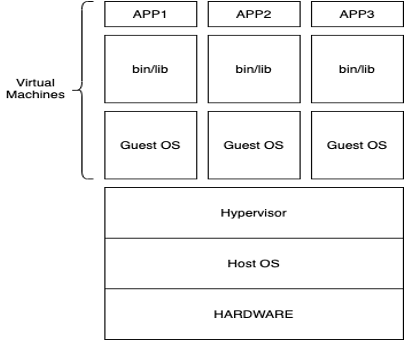
| Uses hardware-level virtualization | Uses OS-level virtualization |
| Has its own OS and shares hardware | Shares OS kernel and hardware |
| Virtual Image = APP + App Dependencies+ Full OS | Docker Image = APP + App Dependencies+ OS without kernel |
| VMs are heavy and slow as OS needs to boot up | Containers are lightweight and fast. Docker container OS does not need to boot up as base images pack OS without a kernel and Docker container runs as a Linux process -:) |
| VMS can run any flavor OS on Host | Docker containers can run only OS which has the same kernel as Host OS. For example, cannot run windows containers on Linux OS. |
| VMS cannot run inside a Docker container | Docker containers can run inside a VM |
As you read above, the BASE IMAGE that we use in Dockerfile is only has an application layer and hence does not need to boot as the container will use HOST OS. Hence docker is really fast. This is also the reason you can also build a docker image without any base OS image using “scratch”
FROM scratchThe “scratch” keyword is mostly used to create base images. But you can also have your application run using “scratch” by installing all the dependencies. So you will have a really small image as compared to the docker image with a base OS image as it will come with a lot of packages installed.
Installation of docker
Now since you understand a lot about docker. Now start with installing and using it on your local PC or laptop.
You can install Docker on a Mac or Windows and Linux. You can visit https://docs.docker.com/get-docker/ and follow the very detailed steps for installation according to your host OS. When you visit the given link you will be given the option to select your OS flavor and then you can easily install Docker on your local. Once it is done, come back to this tutorial where learn how to start using docker.
Hello World Docker container
Now once docker is installed in your machine. Let’s quickly create a docker container on your local using the docker run command. Since we are not using any Dockerfile so it will just pull the image from a Docker registry and start the base image for you and then run the command that you are passing which is again optional.
$ docker run ubuntu /bin/echo 'Hello world'The output of the command above will look like below:
Unable to find image 'ubuntu:latest' locally
latest: Pulling from library/ubuntu
7b1a6ab2e44d: Pull complete
Digest: sha256:626ffe58f6e7566e00254b638eb7e0f3b11d4da9675088f4781a50ae288f3322
Status: Downloaded newer image for ubuntu:latest
Hello world
As shown above, it pulls the image if not present (in this case from Docker Hub)and then starts it, and then runs the command passed to it and exits. It will use the base image as is and run the container unlike running an image built from Dockerfile where you add more layers to the base image to suit your application needs.
Docker Registry
A Docker registry is a system for versioning, storing, and distributing Docker images. This is from where docker will pull or download the image if it is not already presented locally. And this is where you will push or save your newly created images as well to be used on machines other than yours. You cannot copy and save your image and transfer your images like a file from one machine to another. You will push your image to a Docker Registry and pull it on another machine.
The most popular Docker Registry is the DockerHub which is a hosted registry used by default when installing the Docker engine, but there are other hosted registries available for public use such as AWS, Microsoft’s own registry, and Google’s own registries.
For a real-life project, you will need a private registry as you do not want people to access your private images which have your application code. You can use Docker Hub, AWS, Google and Microsoft, and a few other providers to create your private registry only accessible to you. You can also create your own private registry on your local or some server using the official Docker Registry image and play with it for learning purposes. The below is how it is started:
$ docker run -d -p 5000:5000 --restart always --name registry registry:2Once started you can pull an image from the public Docker Hub Registry and then push it to your private registry as follows:
$ docker pull ubuntu
$ docker tag ubuntu localhost:5000/ubuntu
$ docker push localhost:5000/ubuntu
Now we can use our local registry image to run the hello world program:
$ docker run localhost:5000/ubuntu /bin/echo 'Hello world'In a Dockerfile the FROM will look like below:
FROM localhost:5000/ubuntuDocker commands to run docker containers
Till now we have learned a great deal about docker concepts and have also installed docker. Now let’s learn about docker commands that you will be using on a daily basis while working on docker.
In this section, we will revisit commands that we have already used in the above sections and learn a bit more about them.
Docker build command
Docker build command is used to build or create images for your applications. In microservices-based applications, you may have tens to hundreds of small application code repositories and hence will need tens or hundreds of docker images. This is because the docker image is your deployment artifact. The build image command is as follows:
docker build -t <your_username>/my-private-repo:<version> .In the above, the dot at end of the command refers to the location of the Dockerfile. You will generally run this command from the root of your application code and will also have Dockerfile at the same location, otherwise, give the path of Dockefile.
If you do not wish to push your images to a registry and only want to learn docker you can just simply use below:
docker build -t <image-name>:<version> .The above is a typical build command that you will use to build your image. This command if run without version (example, 1.0 or 1.1 or 2.0 and so on) will create an image as the latest tag. If run without tag.
$ docker build .
$ docker images
REPOSITORY              TAG                 IMAGE ID            CREATED             SIZE
<none>                  <none>              fd69c90c69a9        13 seconds ago      927MB
Now if we build using tag and no version
$ docker images
REPOSITORY              TAG                 IMAGE ID            CREATED              SIZE
myimage1                latest              fd69c90c69a9        About a minute ago   927MB
Now on using version
$ docker images
REPOSITORY              TAG                 IMAGE ID            CREATED             SIZE
myimage1                1.0                 fd69c90c69a9        6 minutes ago       927MB
myimage1                latest              fd69c90c69a9        6 minutes ago       927MB
$ docker build  -t idltutorials/flask-demo:1.0 .
$ docker images
REPOSITORY                TAG                 IMAGE ID            CREATED             SIZE
idltutorials/flask-demo   1.0                 fd69c90c69a9        10 minutes ago      927MB
myimage1                  1.0                 fd69c90c69a9        10 minutes ago      927MB
myimage1                  latest              fd69c90c69a9        10 minutes ago      927MB
$ docker run idltutorials/flask-demo:1.0
* Serving Flask app "main" (lazy loading)
* Environment: production
WARNING: Do not use the development server in a production environment.
Use a production WSGI server instead.
* Debug mode: on
* Running on all addresses.
WARNING: This is a development server. Do not use it in a production deployment.
* Running on http://172.17.0.2:8090/ (Press CTRL+C to quit)
* Restarting with stat
* Debugger is active!
* Debugger PIN: 672-821-496
$ curl http://localhost:8090
curl: (7) Failed to connect to localhost port 8090: Connection refused
$ docker ps
CONTAINER ID IMAGE COMMAND CREATED STATUS PORTS NAMES
6dd9b1fbbbde idltutorials/flask-demo:1.0 "python ./main.py" About a minute ago Up About a minute 8090/tcp unruffled_proskuriakova$ docker run -p 8090:8090 idltutorials/flask-demo:1.0$ docker ps
CONTAINER ID IMAGE COMMAND CREATED STATUS PORTS NAMES
01cdb4ea4087 idltutorials/flask-demo:1.0 "python ./main.py" 9 seconds ago Up 8 seconds 0.0.0.0:8090->8090/tcp trusting_tesla$ curl http://localhost:8090
Hello World from Flask$ docker run -p 8090:8090 idltutorials/flask-demo:1.0
* Serving Flask app "main" (lazy loading)
* Environment: production
WARNING: Do not use the development server in a production environment.
Use a production WSGI server instead.
* Debug mode: on
* Running on all addresses.
WARNING: This is a development server. Do not use it in a production deployment.
* Running on http://172.17.0.2:8090/ (Press CTRL+C to quit)
* Restarting with stat
* Debugger is active!
* Debugger PIN: 872-355-518
172.17.0.1 - - [14/Nov/2021 22:25:16] "GET / HTTP/1.1" 200 -$ docker run -d -p 8090:8090 idltutorials/flask-demo:1.0
9dba6f82fd93009cce92a913b64f9c1c4c1e34edc66a8f5525ac8b240117ea95$ docker ps
CONTAINER ID IMAGE COMMAND CREATED STATUS PORTS NAMES
9dba6f82fd93 idltutorials/flask-demo:1.0 "python ./main.py" 24 seconds ago Up 23 seconds 0.0.0.0:8090->8090/tcp compassionate_bhaskara$ curl http://localhost:8090
Hello World from Flask$ docker run -d --name demo-container1 -p 8091:8090 idltutorials/flask-demo:1.0
16adc5ed58e326dd99a41b27fd51dcdd3b98df8098c4ed5b7fb9dc640d8b5e92$ docker ps
CONTAINER ID IMAGE COMMAND CREATED STATUS PORTS NAMES
16adc5ed58e3 idltutorials/flask-demo:1.0 "python ./main.py" 20 seconds ago Up 19 seconds 0.0.0.0:8091->8090/tcp demo-container1
9dba6f82fd93 idltutorials/flask-demo:1.0 "python ./main.py" 3 minutes ago Up 3 minutes 0.0.0.0:8090->8090/tcp compassionate_bhaskara$ curl http://localhost:8091
Hello World from FlaskDocker ps command
$ docker ps
CONTAINER ID        IMAGE                         COMMAND              CREATED             STATUS              PORTS                    NAMES
16adc5ed58e3        idltutorials/flask-demo:1.0   "python ./main.py"   20 seconds ago      Up 19 seconds       0.0.0.0:8091->8090/tcp   demo-container1
9dba6f82fd93        idltutorials/flask-demo:1.0   "python ./main.py"   3 minutes ago       Up 3 minutes        0.0.0.0:8090->8090/tcp   compassionate_bhaskara
$ docker ps -a
CONTAINER ID IMAGE COMMAND CREATED STATUS PORTS NAMES
16adc5ed58e3 idltutorials/flask-demo:1.0 "python ./main.py" About a minute ago Up About a minute 0.0.0.0:8091->8090/tcp demo-container1
9dba6f82fd93 idltutorials/flask-demo:1.0 "python ./main.py" 5 minutes ago Up 5 minutes 0.0.0.0:8090->8090/tcp compassionate_bhaskara
01cdb4ea4087 idltutorials/flask-demo:1.0 "python ./main.py" 8 minutes ago Exited (0) 5 minutes ago trusting_tesla
6dd9b1fbbbde idltutorials/flask-demo:1.0 "python ./main.py" 9 minutes ago Exited (0) 8 minutes ago unruffled_proskuriakova
Docker logs
$ docker logs 16adc5ed58e3 -f
 * Serving Flask app "main" (lazy loading)
 * Environment: production
   WARNING: Do not use the development server in a production environment.
   Use a production WSGI server instead.
 * Debug mode: on
 * Running on all addresses.
   WARNING: This is a development server. Do not use it in a production deployment.
 * Running on http://172.17.0.3:8090/ (Press CTRL+C to quit)
 * Restarting with stat
 * Debugger is active!
 * Debugger PIN: 749-993-607
172.17.0.1 - - [14/Nov/2021 22:31:36] "GET / HTTP/1.1" 200 -
172.17.0.1 - - [14/Nov/2021 22:34:10] "GET / HTTP/1.1" 200 -
Docker stop container
$ docker ps
CONTAINER ID        IMAGE                         COMMAND              CREATED             STATUS              PORTS                    NAMES
16adc5ed58e3        idltutorials/flask-demo:1.0   "python ./main.py"   4 minutes ago       Up 3 minutes        0.0.0.0:8091->8090/tcp   demo-container1
9dba6f82fd93        idltutorials/flask-demo:1.0   "python ./main.py"   7 minutes ago       Up 7 minutes        0.0.0.0:8090->8090/tcp   compassionate_bhaskara
$ docker container stop 9dba6f82fd93
9dba6f82fd93
$ docker ps
CONTAINER ID IMAGE COMMAND CREATED STATUS PORTS NAMES
16adc5ed58e3 idltutorials/flask-demo:1.0 "python ./main.py" 4 minutes ago Up 4 minutes 0.0.0.0:8091->8090/tcp demo-container1$ curl http://localhost:8090
curl: (7) Failed to connect to localhost port 8090: Connection refused$ docker ps -a
CONTAINER ID IMAGE COMMAND CREATED STATUS PORTS NAMES
16adc5ed58e3 idltutorials/flask-demo:1.0 "python ./main.py" 5 minutes ago Up 5 minutes 0.0.0.0:8091->8090/tcp demo-container1
9dba6f82fd93 idltutorials/flask-demo:1.0 "python ./main.py" 8 minutes ago Exited (0) About a minute ago compassionate_bhaskara
...$ docker stop 16adc5ed58e3
16adc5ed58e3$ docker ps
CONTAINER ID IMAGE COMMAND CREATED STATUS PORTS NAMES$ docker ps -a
CONTAINER ID IMAGE COMMAND CREATED STATUS PORTS NAMES
16adc5ed58e3 idltutorials/flask-demo:1.0 "python ./main.py" 7 minutes ago Exited (0) 48 seconds ago demo-container1
9dba6f82fd93 idltutorials/flask-demo:1.0 "python ./main.py" 11 minutes ago Exited (0) 3 minutes ago compassionate_bhaskara
Docker restart container
$ docker container restart 9dba6f82fd93
9dba6f82fd93
$ docker ps
CONTAINER ID IMAGE COMMAND CREATED STATUS PORTS NAMES
9dba6f82fd93 idltutorials/flask-demo:1.0 "python ./main.py" 13 minutes ago Up 16 seconds 0.0.0.0:8090->8090/tcp compassionate_bhaskara$ docker restart 16adc5ed58e3
16adc5ed58e3
$ docker ps
CONTAINER ID IMAGE COMMAND CREATED STATUS PORTS NAMES
16adc5ed58e3 idltutorials/flask-demo:1.0 "python ./main.py" 11 minutes ago Up 7 seconds 0.0.0.0:8091->8090/tcp demo-container1
9dba6f82fd93 idltutorials/flask-demo:1.0 "python ./main.py" 14 minutes ago Up 47 seconds 0.0.0.0:8090->8090/tcp compassionate_bhaskara
Docker remove container (To recreate a container)
$ docker stop 16adc5ed58e3
16adc5ed58e3
$ docker run -d --name demo-container1 -p 8091:8090 idltutorials/flask-demo:1.0
docker: Error response from daemon: Conflict. The container name "/demo-container1" is already in use by container "16adc5ed58e326dd99a41b27fd51dcdd3b98df8098c4ed5b7fb9dc640d8b5e92". You have to remove (or rename) that container to be able to reuse that name.
See 'docker run --help'.
$ docker container rm 16adc5ed58e3
16adc5ed58e3
$ docker ps -a
CONTAINER ID        IMAGE                         COMMAND                  CREATED             STATUS                      PORTS                    NAMES
9dba6f82fd93        idltutorials/flask-demo:1.0   "python ./main.py"       17 minutes ago      Up 4 minutes                0.0.0.0:8090->8090/tcp   compassionate_bhaskara
01cdb4ea4087        idltutorials/flask-demo:1.0   "python ./main.py"       20 minutes ago      Exited (0) 17 minutes ago                            trusting_tesla
6dd9b1fbbbde        idltutorials/flask-demo:1.0   "python ./main.py"       22 minutes ago      Exited (0) 21 minutes ago                            unruffled_proskuriakova
6807f6fc2435        idltutorials/flask-demo:1.0   "-p 8090:8090"           23 minutes ago      Created                     8090/tcp                 jolly_napier
6a149016a0ee        idltutorials/flask-demo:1.0   "python ./main.py"       25 minutes ago      Exited (0) 23 minutes ago                            elegant_hypatia
$ docker run -d --name demo-container1 -p 8091:8090 idltutorials/flask-demo:1.0
d514e30258d0429ebe37f5b7636c8dda99f5bc7f999bee617477fe82fbe86133$ docker ps
CONTAINER ID IMAGE COMMAND CREATED STATUS PORTS NAMES
d514e30258d0 idltutorials/flask-demo:1.0 "python ./main.py" 22 seconds ago Up 20 seconds 0.0.0.0:8091->8090/tcp demo-container1
9dba6f82fd93 idltutorials/flask-demo:1.0 "python ./main.py" 19 minutes ago Up 5 minutes 0.0.0.0:8090->8090/tcp compassionate_bhaskaraDocker list command
$ docker container ps
CONTAINER ID        IMAGE                         COMMAND              CREATED             STATUS              PORTS                    NAMES
d514e30258d0        idltutorials/flask-demo:1.0   "python ./main.py"   43 seconds ago      Up 42 seconds       0.0.0.0:8091->8090/tcp   demo-container1
9dba6f82fd93        idltutorials/flask-demo:1.0   "python ./main.py"   19 minutes ago      Up 5 minutes        0.0.0.0:8090->8090/tcp   compassionate_bhaskara
$ docker container ls
CONTAINER ID IMAGE COMMAND CREATED STATUS PORTS NAMES
d514e30258d0 idltutorials/flask-demo:1.0 "python ./main.py" 56 seconds ago Up 55 seconds 0.0.0.0:8091->8090/tcp demo-container1
9dba6f82fd93 idltutorials/flask-demo:1.0 "python ./main.py" 19 minutes ago Up 5 minutes 0.0.0.0:8090->8090/tcp compassionate_bhaskara$ docker ls
docker: 'ls' is not a docker command.Docker commands for troubleshooting
In order to troubleshoot the docker containers. You may use below commands:
Get container information such as, container-id and check the node status if it is Up
$ docker ps -aRetrieve the logs for a container
$ docker logs <container-id>Use the command below to stop the failed container, if it is still running
$ docker stop <container-id>Delete the stopped container
$ docker rm <container-id>Conclusion
I hope you got fair bit of Idea on what docker is and how it works. If you are very beginner this article marks the beginning of your Docker Journey… Go and explore more!! Best of luck!!