
Open Policy Agent (OPA) Gatekeeper – Kubernetes Security Hardening
In addition to having secure images and secure PODS and encrypted POD to POD communication (Check my other blogs under Guides > Kubernetes Security Hardening), we need a policy based control over the cluster.
The few policy based control are listed below to give an idea about policy based control
- Allow images from certain image registries only
- Enforce certain Namespace Labels.
- Enforce Deployment replica count
- Fail deployment on privileged pods.
And so on….
This can be achieved using Open Policy Agent aka OPA. OPA is a graduated project in the Cloud Native Computing Foundation (CNCF) landscape.
Open Policy Agent (OPA) is an open source, general-purpose policy engine that enables unified, context-aware policy enforcement across the entire stack.
OPA is not Kubernetes specific and can be used to create policies for other tools like Terraform as well.
We can create Policies with OPA using a language called Rego. Rego is OPA’s native language and makes it easy to read and write OPA policies.
How OPA works in Kubernetes?
OPA is deployed as a admission controller in Kubernetes.
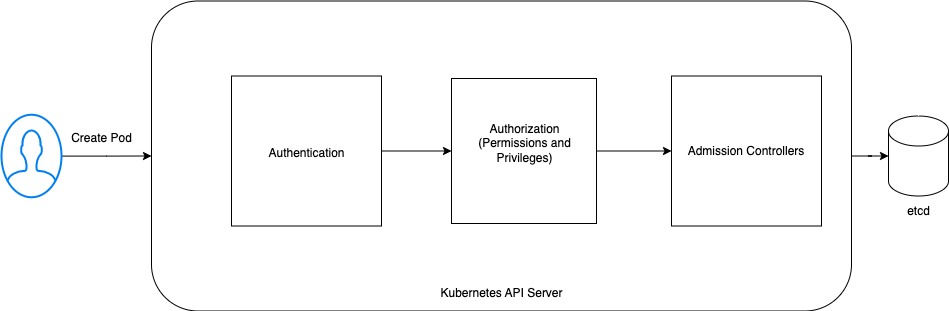
Admission controllers are a powerful Kubernetes-native feature that helps you decide what is allowed to run on your cluster. The admission controllers can intercept requests after they have been authenticated and authorized by the K8s API server, but before they are persisted in the database or actually created. If any of the admission controllers rejects the request then the overall request is rejected and resource creation fails.
There are few inbuilt admission controllers as well like ResourceQuota, DefaultIngressClass, etc.
OPA is deployed as a validatingadmissionwebhook by default which validates requests. Recently OPA has added functionality to be able to deployed as mutating webhook as well which means you can modify resources before getting created, for example, adding a label on the fly before POD is created.
In Kubernetes, you do not have to install plain OPA. The recommended method to install OPA to a Kubernetes cluster is using OPA Gatekeeper.
Once you install OPA Gatekeeper, it works as follows:
- Provide you a Custom Resource Definition (CRD)
ConstraintTemplate - You create your own CRDs using
ConstraintTemplateand Rego language (to define what this CRD will do). - Then use these CRDs to create your own Custom Resources called
Constraints.
It sounds confusing. In next section we will first install OPA Gatekeeper and then we will create a OPA policy then the above will become clear. OPA is very powerful and you can write lot of great policies.
Set up Lab
Let’s set up lab using below
Installing OPA Gatekeeper
Now let’s install OPA gatekeeper
# kubectl apply -f https://raw.githubusercontent.com/open-policy-agent/gatekeeper/master/deploy/gatekeeper.yamlThe above will install OPA Gatekeeper in gatekeeper-system namespace
# kubectl get all -n gatekeeper-system
NAME                                                 READY   STATUS    RESTARTS      AGE
pod/gatekeeper-audit-7b6dbf4c79-bdrw4                1/1     Running   1 (52s ago)   71s
pod/gatekeeper-controller-manager-5cf969894d-2zk8d   1/1     Running   0             71s
pod/gatekeeper-controller-manager-5cf969894d-5d4hw   1/1     Running   0             71s
pod/gatekeeper-controller-manager-5cf969894d-8t7cd   1/1     Running   0             71s

NAME                                 TYPE        CLUSTER-IP      EXTERNAL-IP   PORT(S)   AGE
service/gatekeeper-webhook-service   ClusterIP   10.96.226.145   <none>        443/TCP   71s

NAME                                            READY   UP-TO-DATE   AVAILABLE   AGE
deployment.apps/gatekeeper-audit                1/1     1            1           71s
deployment.apps/gatekeeper-controller-manager   3/3     3            3           71s

NAME                                                       DESIRED   CURRENT   READY   AGE
replicaset.apps/gatekeeper-audit-7b6dbf4c79                1         1         1       71s
replicaset.apps/gatekeeper-controller-manager-5cf969894d   3         3         3       71s
As you can see OPA Gatekeeper is deployed as webhook. It is that simple!
Create OPA Policy!!
Let’s create a OPA policy now.
We will create a humble label required policy to see how OPA works and then will introduce you to community based Policy library where you can find all the examples you need to create a policy controlled Kubernetes Cluster.
So first we need to create CRD with help of ConstraintTemplate.
Copy the below yaml and save it in a file called opa_constraint_template.yaml
apiVersion: templates.gatekeeper.sh/v1
kind: ConstraintTemplate
metadata:
  name: k8srequiredlabels
spec:
  crd:
    spec:
      names:
        kind: K8sRequiredLabels
      validation:
        # Schema for the `parameters` field
        openAPIV3Schema:
          type: object
          properties:
            labels:
              type: array
              items:
                type: string
  targets:
    - target: admission.k8s.gatekeeper.sh
      rego: |
        package k8srequiredlabels

        violation[{"msg": msg, "details": {"missing_labels": missing}}] {
          provided := {label | input.review.object.metadata.labels[label]}
          required := {label | label := input.parameters.labels[_]}
          missing := required - provided
          count(missing) > 0
          msg := sprintf("you must provide labels: %v", [missing])
        }
Here we are creating a Constraint Template and calling it k8srequiredlabels.
Under spec you can see, it is defining a CRD (Custom Resource Definition) for a Custom Resource K8sRequiredLabels
Under target, we are using rego to define what this CRD’s Custom Resources will do.
Above Rego code throws a violation if a label is missing. Now which label is missing is passed as variable in Constraint.
Copy the below code in file opa_constraint.yaml
apiVersion: constraints.gatekeeper.sh/v1beta1
kind: K8sRequiredLabels
metadata:
  name: ns-must-have-gk
spec:
  match:
    kinds:
      - apiGroups: [""]
        kinds: ["Pod"]
  parameters:
    labels: ["gatekeeper", "opa"]
The above policy will be applied to all Pods and will only allow Pods to be created if Labels “gatekeeper” and “opa” are provided.
Awesome! Now lets create OPA policy
# kubectl apply -f opa_constraint_template.yaml

# kubectl apply -f opa_constraint.yaml
That’s it!! Since it is a Constraint is a custom resource, we can query it like K8s Resources
# kubectl get K8sRequiredLabels
NAME              ENFORCEMENT-ACTION   TOTAL-VIOLATIONS
ns-must-have-gk                        25
As we can see it already see 25 violations. You can describe to see what are the violations
 # kubectl describe K8sRequiredLabels ns-must-have-gk
...
    Enforcement Action:  deny
    Group:
    Kind:                Pod
    Message:             you must provide labels: {"gatekeeper", "opa"}
    Name:                coredns-6d4b75cb6d-xwrpw
    Namespace:           kube-system
    Version:             v1
.....
You can see it is highlighting a POD in kube-system. It is showing violation but it won’t stop already running pods. It will impact new pods creations.
Awesome!! We have a OPA policy in place
Test OPA policy
Now let’s test our OPA policy we created
Copy and paste the below yaml in file nginx-demo.yaml
apiVersion: v1
kind: Pod
metadata:
  name: nginx
  labels:
    environment: demo
spec:
  containers:
  - name: nginx
    image: nginx:1.14.2
    ports:
    - containerPort: 80
This Pod manifest do not have labels “gatekeeper” and “opa”
Let’s try to deploy and see what happens
# kubectl apply -f nginx-demo.yaml
Error from server (Forbidden): error when creating "nginx-demo.yaml": admission webhook "validation.gatekeeper.sh" denied the request: [ns-must-have-gk] you must provide labels: {"gatekeeper", "opa"}
We can verify with kubectl
# kubectl get pods
No resources found in default namespace.
Awesome!! As expected, we could not create POD without mandatory labels.
Lets edit the file and add our labels
apiVersion: v1
kind: Pod
metadata:
  name: nginx
  labels:
    environment: demo
    gatekeeper: demo
    opa: demo
spec:
  containers:
  - name: nginx
    image: nginx:1.14.2
    ports:
    - containerPort: 80
We added labels and gave them values demo.
Let’s try to create POD again
 # kubectl apply -f nginx-demo.yaml
pod/nginx created
It worked!! Once we added required labels we were able to create our POD.
Let’s verify with kubectl
# kubectl get pods
NAME    READY   STATUS    RESTARTS   AGE
nginx   1/1     Running   0          93s
We can see our POD running!!
We have successfully created a OPA policy to enforce addition of certain labels.
OPA Policy Library
The above was just one example to give an idea on how OPA policies work. You can access the below community provided library for all the examples you will need to set up OPA policies for your Kubernetes clusters
https://open-policy-agent.github.io/gatekeeper-library/website/
Conclusion
You have learned a great tool OPA which gives you a lot of control over what can be run on your cluster without learning the complexities of creating your own validationadmissionwebhooks. As you can see, it is so easy to create these policies. I hope this will help you to add this tool to your Kubernetes tool box and help you improve security posture of your clusters!!