
Introduction to Kubernetes – A Beginner’s Guide
Kubernetes or k8s is a very popular and a must know tool for anyone in DevOps.
It is a container orchestration tool maintained by CNCF (Cloud Native Computing Foundation).
In todays world when all the companies are moving away from monolithic applications and transforming their applications into loosely coupled or decoupled microservices and deploying those microservices as containers , there is a need of a tool which provides a eco-system that can not just orchestrate these containers but also provides easy administration and full control over containers. These microservices can be hundreds or even thousands and hence deploying, scaling and ensuring their high availability via custom scripts or tools is extremely hard and painful process. Hence the need of such a tool
There are many orchestration tools out there but the Kubernetes stands tall among all of them. It is most robust and reliable and battle hardened tool for container orchestrations and management out there.
Benefits of Kubernetes
Lets list down benefits of using Kubernetes before we get into how it works
- High Availability — It ensures your application will always be up and running, whether you have a new update to roll-out or have some unexpected pods crashing.
- Scalability — It ensures high performance of your application and can quickly scale up if you suddenly have high incoming traffic.
- Disaster Recovery — It ensures that your application will always have the latest data and states of your application if something unfortunate happens to your physical or cloud-based infrastructure.
- Security – Kubernetes can be configured to be highly secure eco-system.
How container deployment works? – In simple words
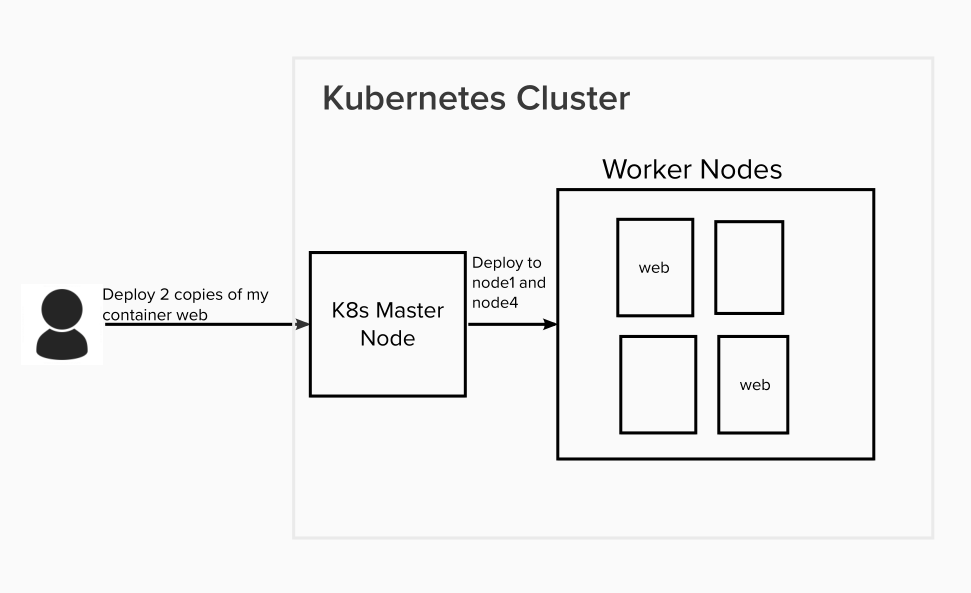
So basically k8s helps orchestrates containers on a group of servers better known as worker nodes which are managed by control pane or master node of Kubernetes. This set up of master and worker nodes is called Kubernetes cluster.
For example, if you want to deploy a docker container or pod (containers are deployed as pods in k8s) to a kubernetes , all you need to do is issue a request to Kubernetes API via kubectl or other tools and tell it to deploy the container with number of replicas (for load balancing) and it will deploy it to the best worker node. You do not have to worry about setting up networking for communication among the containers. It will be taken care by Kubernetes.
Kubernetes Architecture
Lets get under the hood and see whats going inside a Kubernetes cluster and how it works.
As we mentioned before it has two main components:
- Master node or nodes for high availability : It is the control plane which manages requests to K8s cluster and manage the cluster itself
- Worker nodes: This is where application workload is deployed and runs.
Note: A production grade K8s cluster will have a highly available master nodes and worker nodes. If you running your cluster on local for learning development purpose then it may even have just one node running as both master and worker node.
A simple kubernetes architecture looks like below:
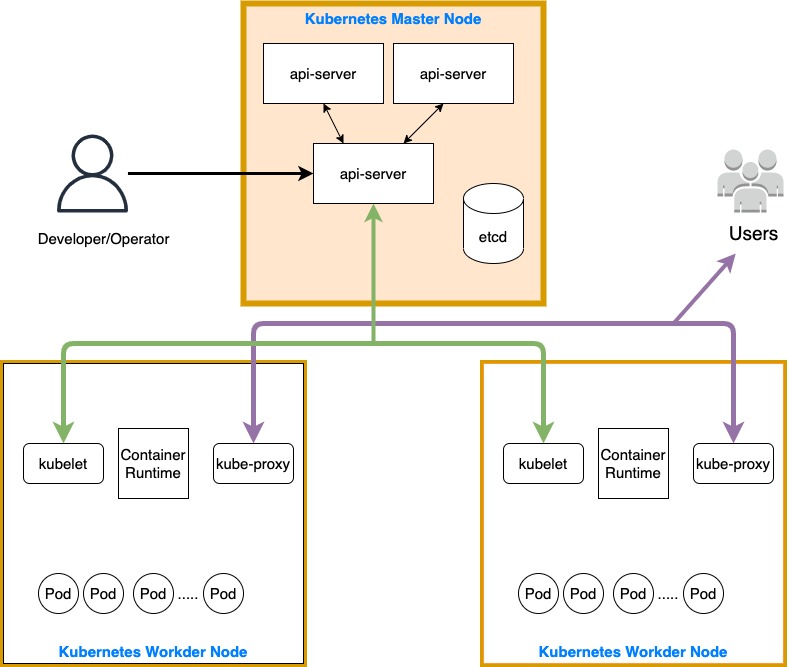
Master Node(s)
This is the node which actually manages the containers/pods and their deployments. The application containers typically do not run on master nodes unless it is a local cluster on your desktop/laptop.
The master has four main components:
API Server
- This is the component which handles incoming requests to cluster management and deployments (NOT for application requests that are send to containers). When we use kubectl, it is talking to api server.
- This components is the basically the entrypoint to cluster and hence also handles cluster authentication.
- This component is also responsible for communication among various other components of k8s. i.e. all components talk to api-server
Scheduler
This one decides on which node to deploy the pod or container automatically or according to any scheduling configuration passed along with pod configuration. But this components only makes decision and sends info to kubelet (runs on worker node) via api-server. It is the kubelet which then creates a pod.
Controller Manager
The controller manager makes sure the cluster always stays in the desired state. If there is drift from desired state, then it makes sure k8s is back to desired state. It has bunch of controllers, for example replication controller which is responsible for making sure all replicas of a pod are running at all times.
For example, if we have 3 replicas of ngnix pod and one crashes for some reason, replication controller will make sure it is restarted again.
etcd
Etcd is a key value database which stores the cluster state. For example a pod configurartion like image name, number of replicas etc.
Woker Nodes
The worker nodes is where you run your application specific pods/containers. The worker nodes have 3 main components
kubelet
The kubelet interacts with node and container. It is responsible for fetching configuration and creating pods when scheduler schedules a pod.
kube-proxy
A network proxy that implements part of the Kubernetes Services (for external requests to application and internal pods communication ) and helps in inter-node and intra-node communication.
Container Runtime
A container runtime software like docker.
Basic building blocks of K8s based application
The below are few of the basic building blocks of k8s based application:
POD
The pod is a smallest unit of Kubernetes. It is basically wrapper for a container and helps to define configuration of a container like what image to use, what labels to use, resources like cpu, memory a container can use . etc. This configuration is done using a k8s spec yaml file which looks like below:
apiVersion: v1
kind: Pod
metadata:
  name: nginx
spec:
  containers:
  - name: nginx
    image: nginx:1.14.2
    ports:
    - containerPort: 80
A pod can have multiple containers.
Each pod is allocated an IP. But PODS are ephemeral and IP will change on restart. So you cannot reply on POD IP to connect to a POD. This problem is solved by Services.
Services
- Because pods are meant to be ephemeral, Service provides a way to “give” pods a permanent IP address
- With Service, if the pod dies, its IP address will not change upon re-creation
- Acts almost as a load balancer that routes traffic to pods while maintaining a static IP
- Like load balancers, the Service can also be internal or external, where external Service is public facing (public IP) and internal Service which is meant for internal applications (private IP)
Deployments
- The way of deploying pods with number of replicas.
- In practice, we deal with deployments and not pods themselves as otherwise we have to deploy each pod one by one. Deployments does this for us.
There are much more Kubernetes resources than above.
A quick Kubernetes practical
Let’s spin up a local cluster on your desktop/laptop.
For this we need docker desktop as container runtime and minikube which is a k8s cluster set up tool.
Please visit for docker desktop installation: https://www.docker.com/products/docker-desktop/
Please visit for minikube installation: https://minikube.sigs.k8s.io/docs/start/
Once both are installed, let’s start the minikube cluster.
minikube startLet’s check if it is started
$ kubectl get nodes
NAME       STATUS   ROLES           AGE   VERSION
minikube   Ready    control-plane   28s   v1.25.3
Great! we have a k8s cluster on our local running one node minikube which is both master and worker node.
If we run below we can see some of the k8s master components running as pods
$ kubectl get pods -n kube-system
NAME                               READY   STATUS    RESTARTS      AGE
coredns-565d847f94-fx79f           1/1     Running   0             72s
etcd-minikube                      1/1     Running   0             82s
kube-apiserver-minikube            1/1     Running   0             82s
kube-controller-manager-minikube   1/1     Running   0             82s
kube-proxy-sbxxb                   1/1     Running   0             72s
kube-scheduler-minikube            1/1     Running   0             82s
storage-provisioner                1/1     Running   1 (41s ago)   81s
Now let’s try to create our first pod. We will save below yaml to file nginx-pod.yaml
apiVersion: v1
kind: Pod
metadata:
  name: nginx
spec:
  containers:
  - name: nginx
    image: nginx:1.14.2
    ports:
    - containerPort: 80
Now we will deploy our pod
$ kubectl apply -f nginx-pod.yaml
pod/nginx created
Nice!
Let’s check the pod
$ kubectl get pods
NAME    READY   STATUS    RESTARTS   AGE
nginx   1/1     Running   0          37s
We can see that we have a nginx pod running in our cluster
Now we have not created a service but we can access the pod also by using port-forward command of kubectl which will expose pod on a port on our localhost network.
$ kubectl port-forward pod/nginx 7080:80
Forwarding from 127.0.0.1:7080 -> 80
Forwarding from [::1]:7080 -> 80
Let’s check in our browser
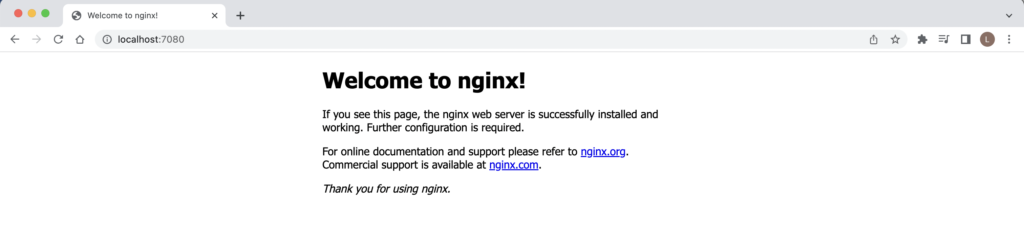
Hurray!!
We created a k8s cluster and then deployed nginx webserver on it and then we successfully exposed it so that we can connect via our brower.
This is a very simple example but it will give you a basic but really good idea on how kubernetes works.
Awesome!! So now your kubernetes journey has started. Go ahead and explore the world of kubernetes…..Best of luck!!!!